
How To Build A Gaslands Car – Part 2
Welcome to the second installment of “How To Build a Gaslands Car”. If you have not read part 1, or have forgotten what it said, you can familiarise yourself with it here. Hopefully, you have a car up to the initial prep stage from part 1 and you are ready to press on with the next step – arming your new creation to the metaphorical teeth!
As you’ll recall, I had two cars in progress – the first intended to be a super quick basic conversion and the second a more considered project with more advanced modelling techniques and the addition of a couple of crew members. Both of these vehicles need some special additions before we can consider them for a game of Gaslands (In fact they don’t, you can play the game with completely unmodified cars if you like. You could even use custard creams, mars bars or any other vaguely rectangular shaped object of roughly the same size as a hotwheels car if you felt so inclined. It’s your hobby – follow your dreams!).
Before you go gung ho into sticking random bits onto the cars though take a moment to have a think about what you are looking for from the end result. Do you have a team sponsor in mind? If so, you might want to consider the background fluff for each faction outlined in the rulebook to guide your hand. Maybe you have been inspired by a famous TV or cinema car, or have a specific weapon loadout you are wanting to deploy. Perhaps you have a particular spare part from another kit that you think will look badass in the Gaslands arena. Whatever the inspiration, it’s a good idea to have at least a vague idea of the direction you want to go for the conversion.
Sometimes it’s worth using a bit of blue tac (other sticky putties are available) to dry fit components onto the car to get an idea of look and positioning (I find this particularly useful when trying to fit crew into a car build).
What I’m saying is, try and have a plan of some kind. It doesn’t need to be super detailed, but you at least want to know what kind of vehicle you are representing in the game (e.g. performance car, truck, etc), what kind of theme you want aesthetically speaking (will it be Highway Patrol, or moonshiners or whatever) and an idea of what weapons you want to add.
Horses For Courses
With that in mind then, what are my plans for these two?

Ugly old Number 68 on the left there is suggestive of a Performance Car and so that’s how I’ll be treating it. Nothing too major on the rebuild, just add a couple of guns and maybe try to indicate a powerful engine without drastically impacting on the shape of the car. There’s no space in there for crew, so I will just be painting the cockpit canopy. This should be a pretty quick conversion job. Paint job wise I will use this car to demonstrate a grungy, post apocalyptic rust bucket look.
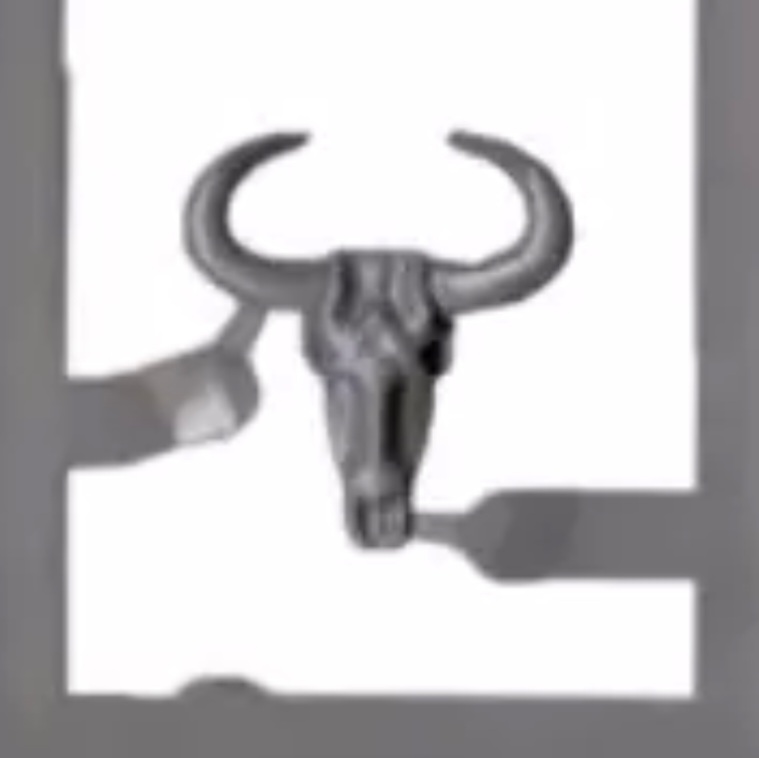
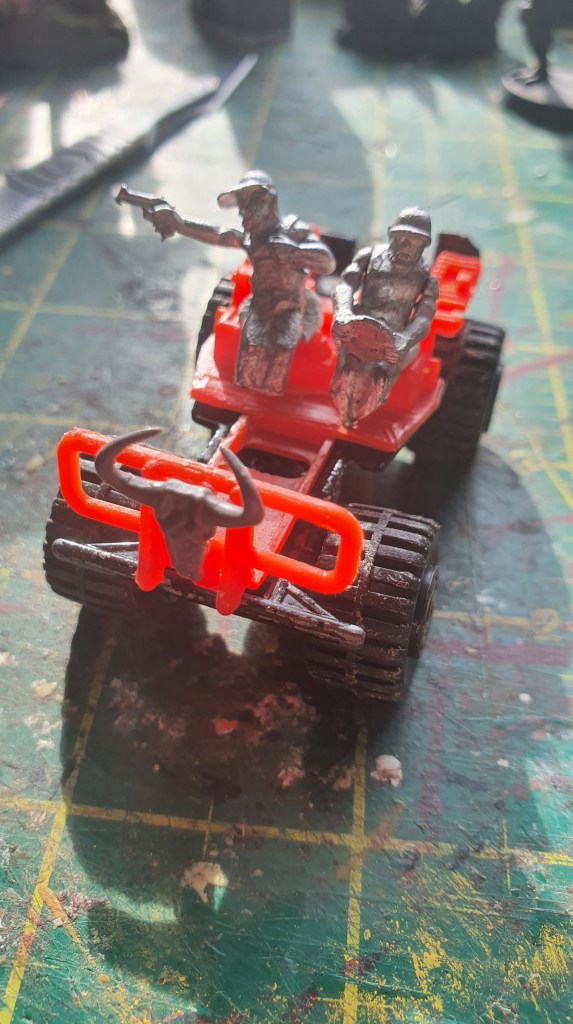
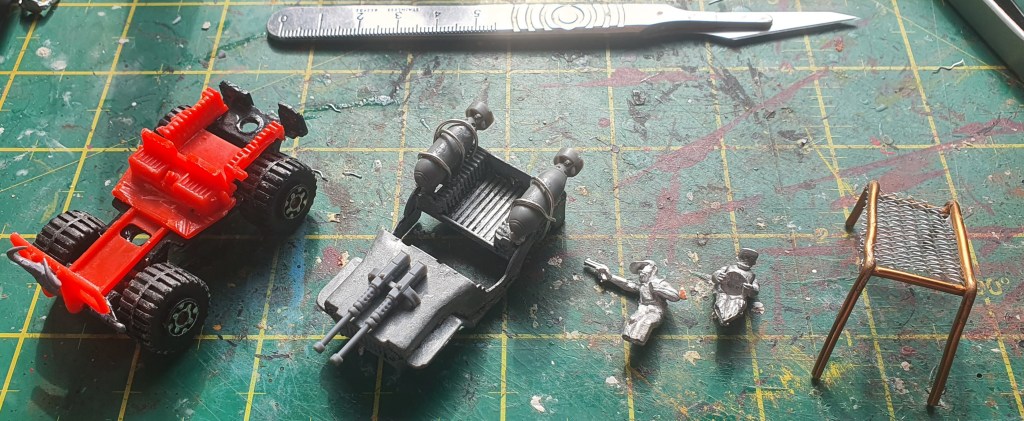
The jeep looking thing on the right is screaming “buggy” to me – I’ll need to build a roll cage onto it somehow and it’s open-topped design means I will also need to add crew. I ordered a box of gunfighters for the Dead Man’s Hand game (I don’t have the game, I needed shotguns for another project) to use for something else and in the kit there was this rather fetching animal skull which I immediately felt needed to be on a Gaslands build.
Given I already have one bootlegger vehicle from a previous build, I decided that this buggy would make an ideal accompaniment. The fact that I have some bootlegger crew models sealed the deal! So car 2 will be a moonshiner’s buggy sporting some cow horns in true redneck style, and I’ll be taking a cleaner approach to the paint job to tie in with my existing redneck-mobile.
The Quick One
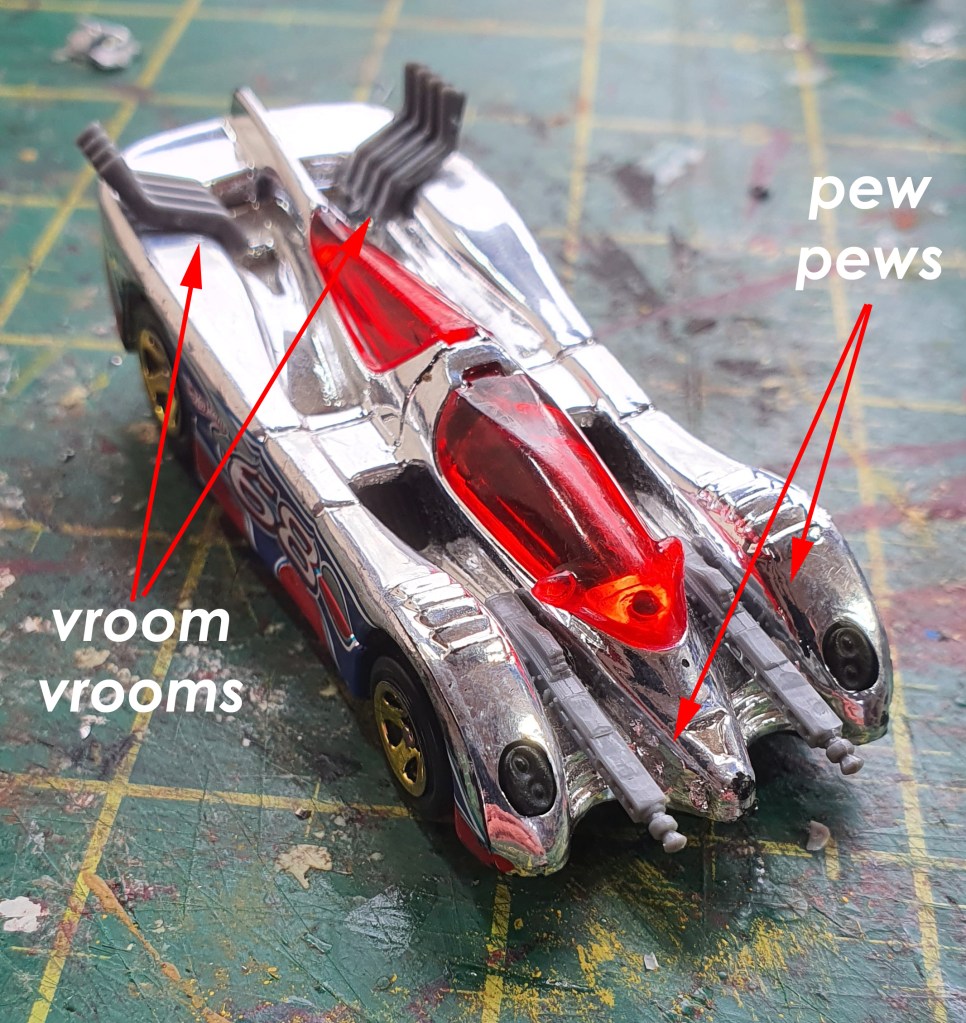
For No.68, I went with a couple of components from the Implements of Carnage weapons sprues that I have previously mentioned. I found a couple of machine guns on the sprues that fitted nicely into the grooves in the body work and secured them in place with a dab of superglue. Pleasingly, the bodywork took the glue well with no issues. Other than the machine guns, I added a couple of over the top exhaust pipes to emphasise that this thing has got some horsepower under the bonnet. Again these sat nicely into the existing bodywork features and were secured with superglue. Just like that, she’s done and ready for priming!Well that was easy! One down, one to go.
The Not So Quick One
The buggy will not be quite so simple a job to get it death race ready. The first challenge is to get the intended crew models to fit into the car in a way that makes logical sense and looks like they are actually in a position to operate the vehicle.
Most of the interiors of these kinds of cars are made of a single piece of molded plastic, which is good news as they are generally easy to modify, but what it also means is that the dashboard area of the car is solid, with no room for the crew’s legs to fit.
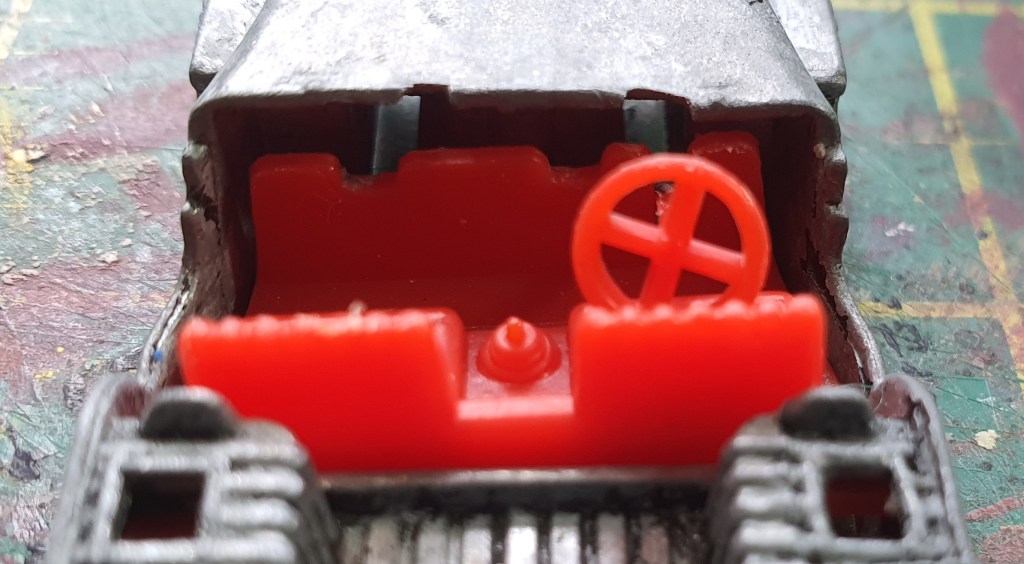
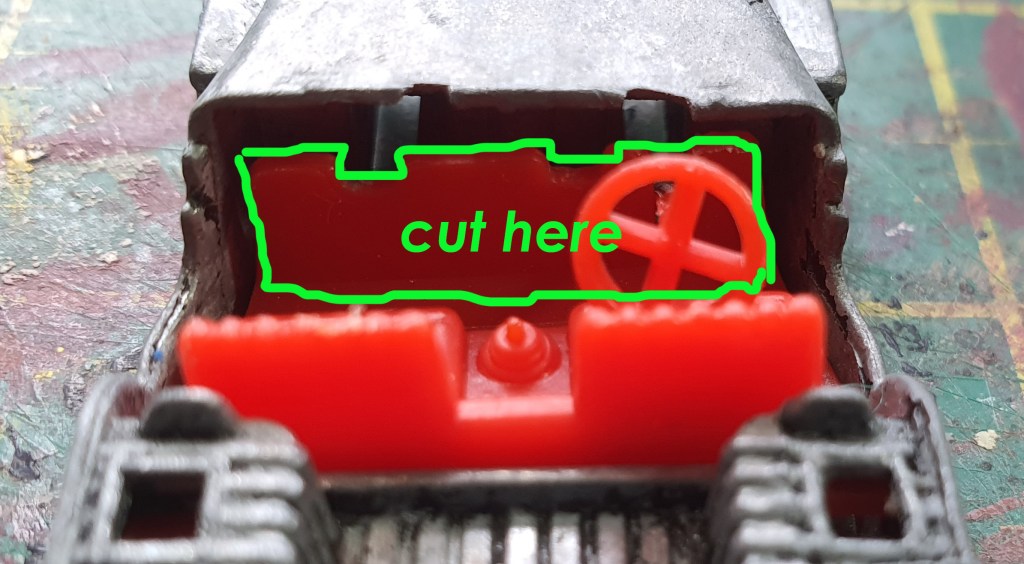
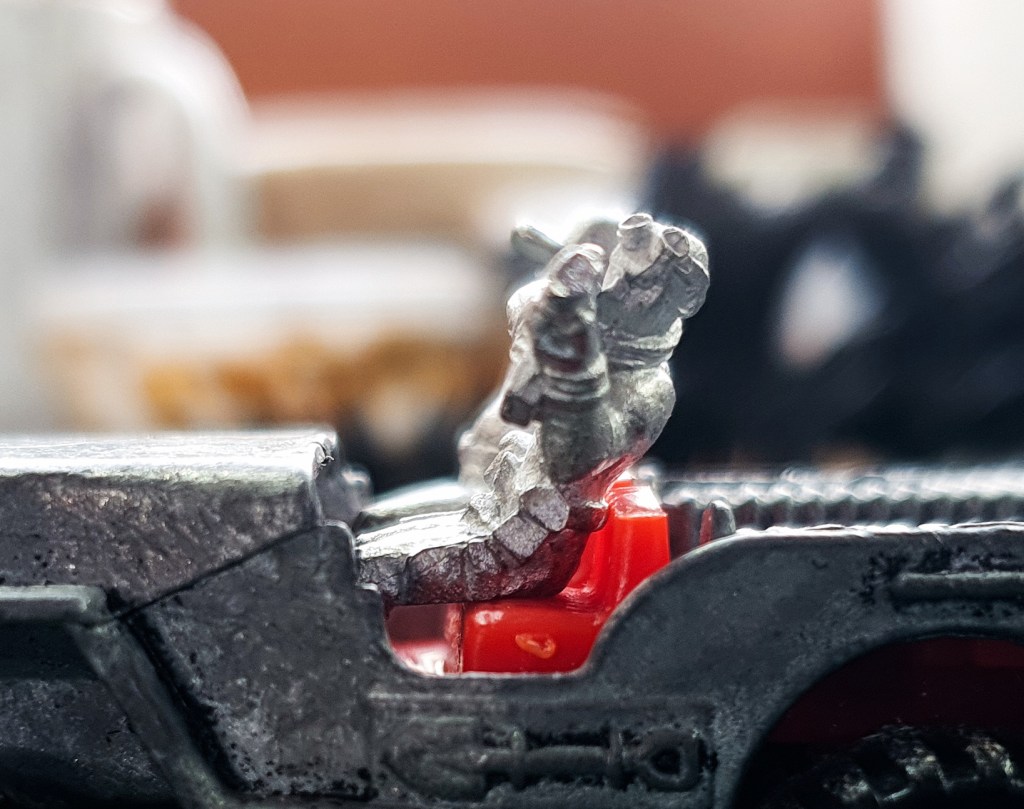
We have a double whammy with this buggy though, as behind the plastic dashboard there are metal parts of the body casting that will get in the way of the crew’s feet and legs. As it stands, if you put the crew in there, they are going to be sitting on the seatbacks with their feet in the seats, sorta like this. Now this might give them a certain amount of nonchalant cool but they definitely won’t be able to reach the pedals.
The solution to this is to cut away the steering wheel and dashboard area to make a cavity for the figure’s legs to fit into and get them sitting on the seat. On this particular model, the metalwork behind the dashboard created a further source of frustration, so in the end I also had to cut the feet off the crew models to shorten their legs below the knees, allowing them to fit, more or less, into the available space.
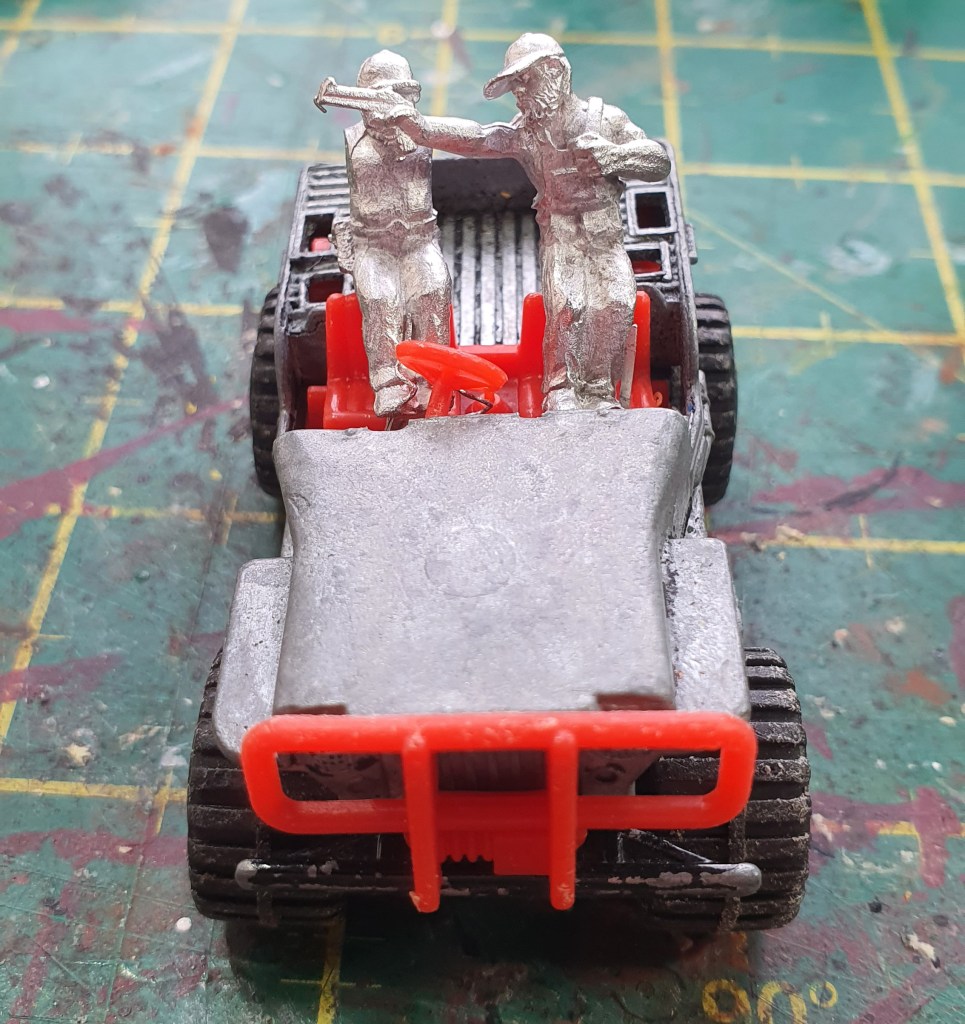
This was effectively a trial and error process, making minor adjustments as I went until I could get them to sit in the seats in a way I was happy with. In the end, I needed to trim off a sliver off the top of both the seats as the extremely upright backs of the seats were playing havoc with the relatively relaxed postures of the crew.
This was by far the most fiddly bit of the process (and often is) but also satisfying when you get the crew to sit the way, or at least as close as possible, to the way you wanted. This process illustrates the importance of a “dry fit” of your components. Essentially this means putting the parts together without glue to check the fit/see how you like them. I find blu-tac extremely helpful for this! You certainly don’t want to superglue something into place and then realise later you need to move it to finish your build. In this case I will also be painting the crew individually before permanently fixing them to the car.
Once I sorted the seating arrangements, my next move was to accessorise the car itself. Starting with the skull that inspired the build!
Although the skull was being attached to the plastic “interior” of the vehicle, the car is made of a rather soft plastic that did not take to polystyrene cement so I just superglued that bad boy on there. I aimed for the centre, but just did it by eye, I always think you don’t necessarily need to be very precise unless that suits the aesthetic of your build from a thematic point of view.
This is a thrown together buggy, assembled by a bunch of bootlegging rednecks in a hurry with improvised materials and tools, so I wasn’t too fussed about how precise I was being – in fact a slightly ramshackle look is part of the vibe.
With the skull mounted, my mind turned to firepower. There isn’t a huge amount of chassis space to mount weapons on this thing and I already have a flatbed truck with a pintel mounted machine gun so didn’t want to repeat that look. Eventually I settled for twin linked machine guns on the bonnet. As luck would have it, they were a perfect fit, nesting nicely between the horns!
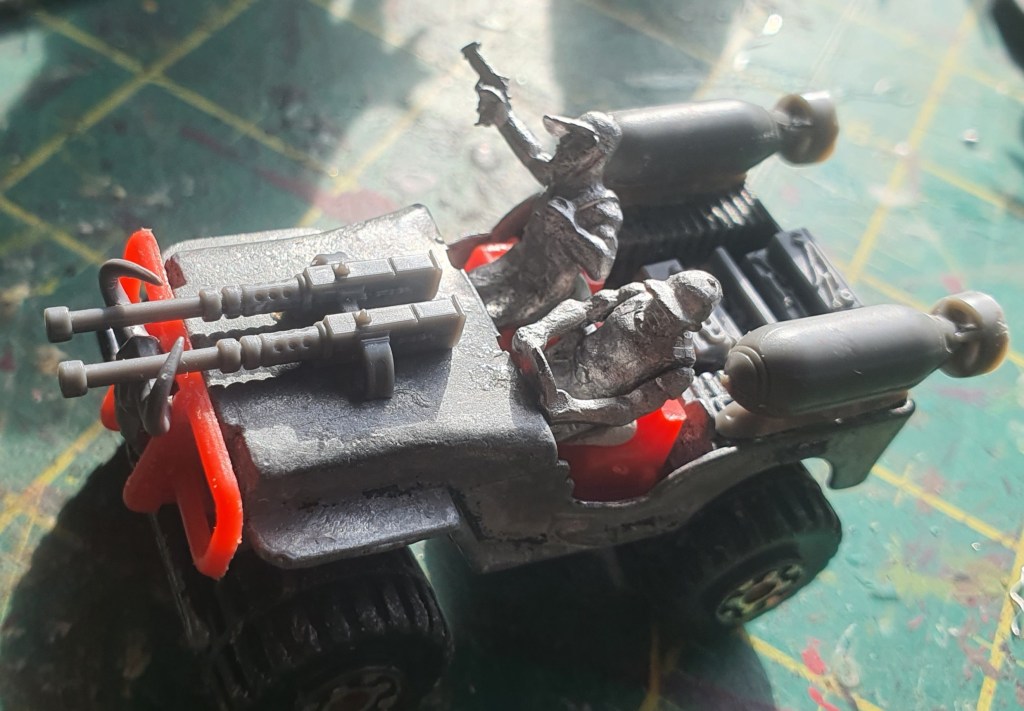
The more eagle eyed among you may also have spotted the two bloody great bombs sitting on the wings. These are leftovers from an Airfix 1:72 scale WW2 kit (1:72 fits nicely with Matchbox scale and 20mm). In this picture they look a little bit tacked on, just balancing there. But don’t worry, I have a plan! I figure the bootleggers found the unexploded bombs in the desert and improvised…
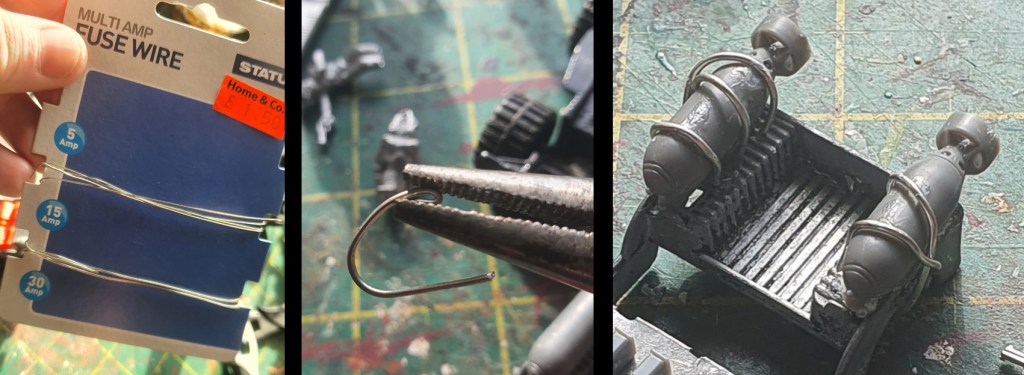
To solve the issue of the barely balanced bombs I figured I’d make them look like they had been lashed to the vehicle by the crew and so needed a way to make some ropes to tied them down. You could do this in a number of ways, but I went for fuse wire, cut to length and bent to shape. I hooked the ends under the wheel arches to make it look like they were anchored solidly onto the vehicle, on the inside I was less careful as this won’t be that visible when the car is in play. Again, superglue was used to secure them in place. They look a little rough and ready just now, but should look fine once painted.
With this done, my last step was to find something to fill that empty flat bed, and it just so happens that there is a toolbox on the Implements of Carnage sprues that fits perfectly. Usually a space like that would be crying out for extra crew, but as I say, I already have a flatbed “technical” and wanted something different. I envisaged these crew as scavenger mechanics who raid the wasteland wrecks for useful parts and so need their tools with them.
At this stage, with all the components attached (the crew and the toolbox were dry fit as I will be painting them separately) I took a step back and had a look. I couldn’t help but feel that something was missing from the build to round it out. In the game, buggies have the “roll cage” rule and actually a roll cage is a pretty important component to an open top vehicle like this for crew survivability. I didn’t have a suitable car to steal one from, or a prefabricated/3D printed one to simply attache, so I had no choice but to scratch build one.
For this, I was initially looking for some brass rod that I could have cut and bent into the required shape but struggled to find any locally, so instead I opted for aluminium florists wire that I picked up for a few pounds in my local Hobbycraft.

I started by playing around with a single length of wire to get a shape I liked that would fit into the structure of the car. Once I got the first side right, I made a duplicate of this for the other side, using the first as a template. With these dry fitted to the car, I measured the cross beams just by holding the wire in place and cutting to fit. As you can see from the pics, it was a case of blu tac to the rescue again, which I used to hold the main roll cage bars in place while I superglued the cross bars into place.
Again, I felt it looked a bit bare, so I dug out some wire mesh salvaged from a cheap kitchen sieve. You can pick these up for a couple of quid and will give you plenty of mesh for your building projects. Cutting them up can be a bit messy, and will leave some wire fragments floating around (you should also beware of getting bits of wire stuck in your fingers). You can get plastic sieves which would also do the job, and would be a lot tidier to work with.
All that was left to do now was do a final dry fit assemble to make sure everything still fitted together and had the overall look I was after.
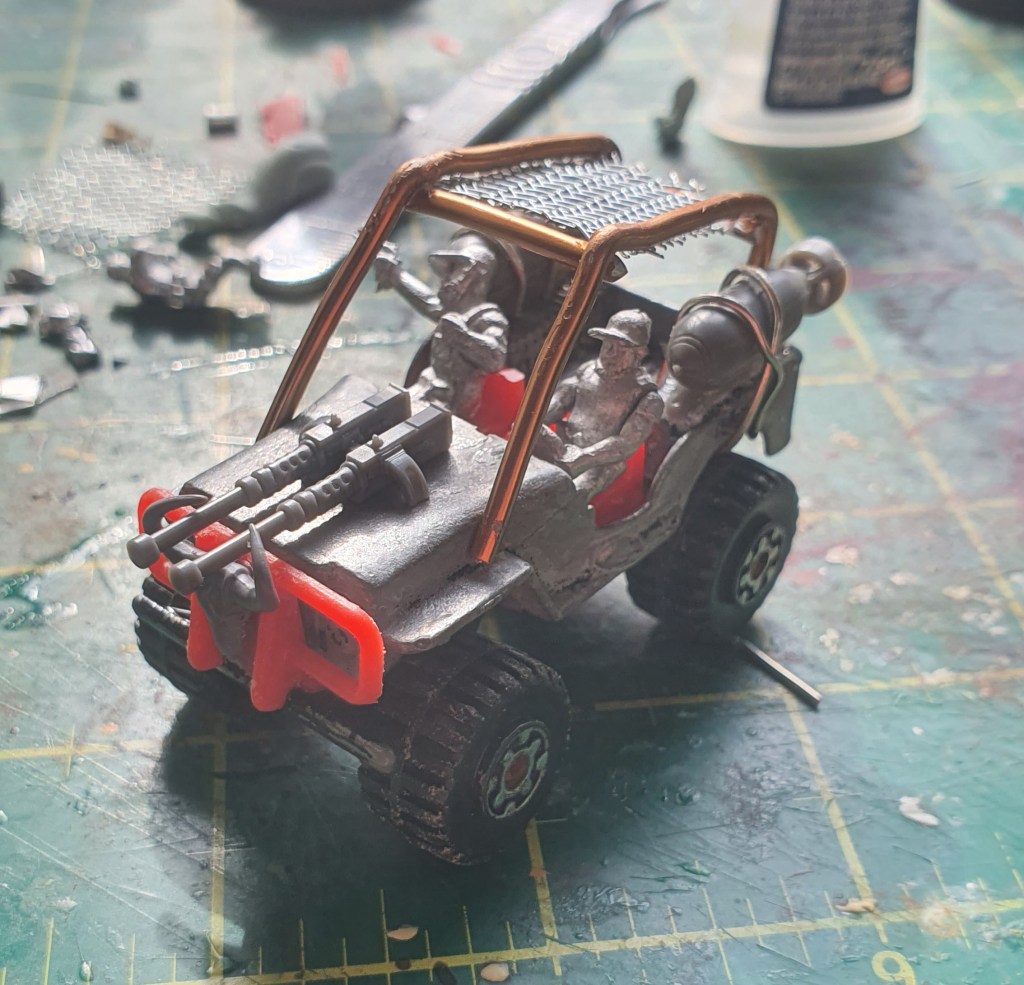
And finally, the buggy build phase is complete! I always look at builds at this stage and get a bit worried, as the mixture of materials and components can (and does) look extremely ramshackle and can actually be a bit dispiriting.
It’s at this point you need to keep the faith, and trust the painting process to save the day. It’s amazing the improvement you will see from just a coat of primer, never mind a completed paint job. Don’t be disheartened because you can see the joins and know what household tat you’ve used to build the model!
The Final Lap
This is one of the great joys of scratch building and converting for me. The moment where, all your hard work and improvisation comes together into a convincing final model. Now, with two cars modified, I am definitely ready to slap some paint on these bad boys and get them tabletop ready, so stay tuned for part 3 of this guide, where I’ll be turning these ramshackle hatchet jobs into things of (hopefully) beauty!

Leave a comment